
Power Automate Flow – Send Email to All Team Members When a Quote is Activated
Have you ever wanted to notify everyone in a team automatically when something important happens in Dynamics 365?
Here’s a simple automation I built using Power Automate — when a Quote is activated, it sends an email to all the team members of the Quote Owner.
This is a small but very useful flow for sales and CRM users who want quick team updates without doing it manually.

Step by Step Explaination
1.Trigger: When a Quote is Activated
Every flow starts with a trigger.
Here, I used the “When a row is added, modified, or deleted” trigger for the Quotes table.
This means whenever a Quote becomes Active, the flow will automatically start — no need to click anything
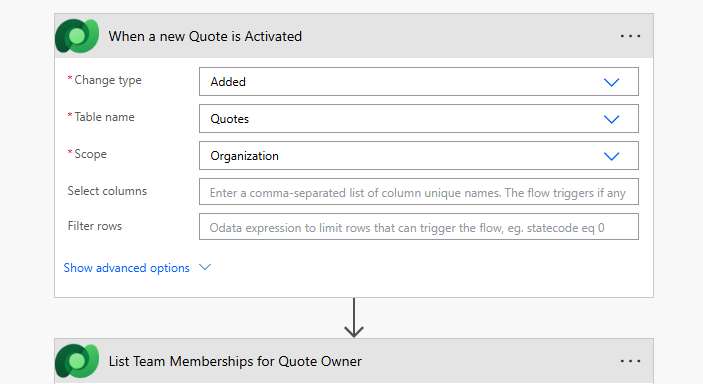
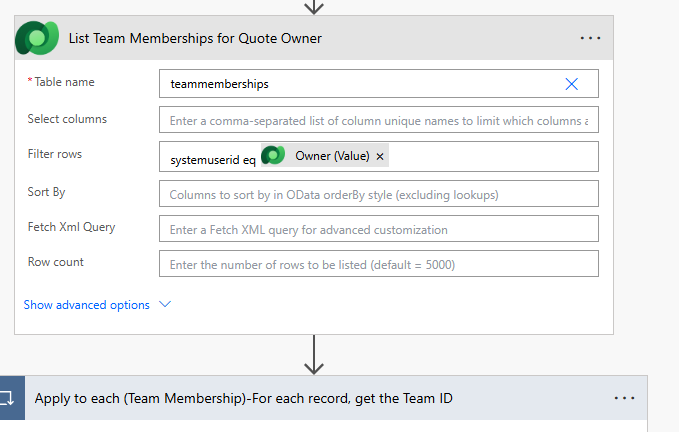
2.List Rows – Get Owner’s Teams
In Dynamics 365, a user can belong to multiple teams.
So, using the List rows action on the teammemberships table, I filtered the records where systemuserid eq Owner (Value)
This gives me all the teams that the Quote Owner is part of.
💡 Note: The teammemberships table sometimes doesn’t appear by default in Power Automate. You can add it manually as a custom table reference.
3. Apply to Each – Loop Through Teams
Now that I have the list of teams, I use an Apply to each loop.
This goes through every team one by one to find all the members inside each team.
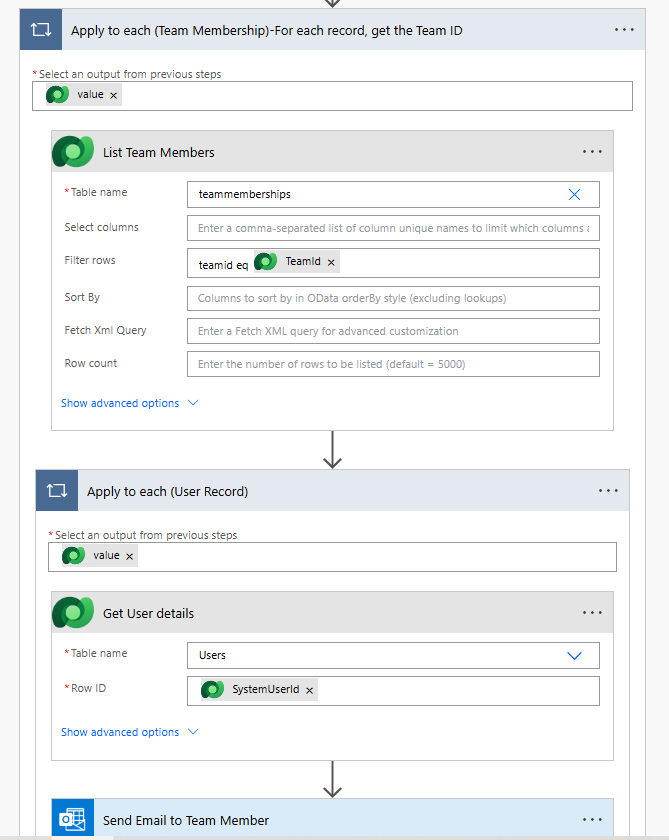
4.List Rows – Get Team Members
Inside the loop, I again use the List rows action on the teammemberships table,
but this time I filter by: teamid eq Teamid
This step gives all the users (members) that belong to the current team.
5.Apply to Each – Loop Through Users
Once I have all the users, I need their details (like email).
So, I use another Apply to each loop to process each user record.
6.Get a Row by ID – Fetch User Details
Here, I use the Get a row by ID action on the Users table.
I pass the systemuserid to get the user’s details such as name and primary email address.
7.Send an Email (V2) – Notify the User
Finally, we send the email!
Final Flow Design
Trigger → Get Owner’s Teams → Loop (Teams) → Get Team Members → Loop (Users) → Get User Details → Send Email
Outcome
Now, whenever a Quote is activated, everyone in the Quote Owner’s team gets notified instantly — keeping your sales team informed and connected, all without manual effort.
This small flow can make a big difference in daily CRM operations.
For more details like this please follow our company LinkedIn page where you will get all the new updates
every week:
https://www.linkedin.com/company/allgrow-technologies-pvt-ltd/mycompany/
or you can write us at contact@allgrowtech.com
-By Goli Sai Vamsi Reddy
Author
Leave a comment
Your email address will not be published
DO YOU WANT TO TURN YOUR IDEA INTO REALITY
Services we offer
Software and Web Development
Consulting Services
Development
Frontend
Backend
DevOps
SAAS
Locate us at
INDIA
4th Floor, Bhavya Corporate Tower,
Vibhuti Khand, Gomti Nagar, Lucknow,
Uttar Pradesh, India 226010
Get in Touch
For Business – contact@allgrowtech.com
For Career – hr@allgrowtech.com
© 2026 ALLGROW TECHNOLOGIES. ALL RIGHTS RESERVED.