
Let’ see how to create simple process only report with one example.


- We can create process only report with or without using ‘Request Page’.
- But it doesn’t need any layout design.
- So, to create ‘Process only Report’, open visual studio code type ‘treport’ and select report snippet.
- Give the proper ID and name.
- In the next step, give the proper caption for the report, set ‘ProcessingOnly propert’ to ‘true’ and set ‘UseRequestPage’ property to false or true according to your need.
- Here I’m creating a ‘Process Only Report’ for increasing the ‘Allowing Posting From’ and ‘Allowing Posting To’ date fields in ‘User Setup’ page.
- So that whenever the report is run, the dates present in those fields should be increased by day.
- As shown below, I’ve given proper Id and name with the required properties.
- Inside the dataset, I’ve used “User Setup” table.
- I’ve written my code inside the trigger OnAfterGetRecord( ).
- By using CalcDate function I’ve written the code for increasing the dates of “Allow Posting From” and “Allow Posting To” fields.
- And I’ve set modify trigger for ‘User Setup’
- And now the report is published!
- After running the report, in the Business central open the ‘Job Queue Entries’ page, click on new, give your report ID, automatically the name of my report will come.
- In the Recurrence section, select the days on which the report should run.
- Go to the Process section in the top and click on ‘Run Once’.
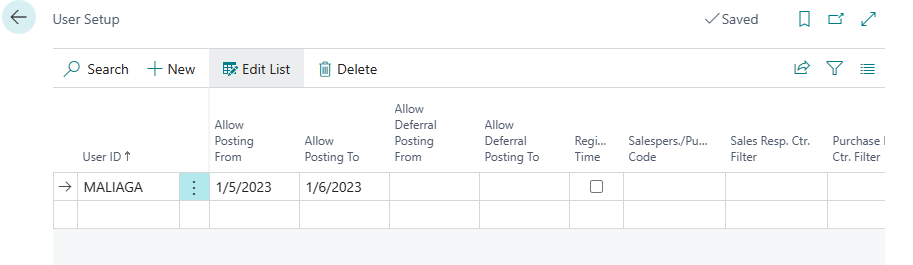
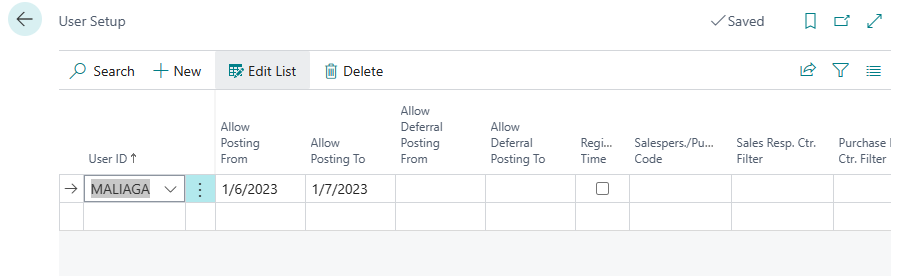
- Open User Setup page and check the dates, the dates will be increased by 1Day.
- The below image shows the previous date.
- After running the report, the below image shows the updated dates.